Journal Entries Tab
Manager Menu-Tabs > Journal Entries

Journal Entries Tab
Journal entries record accounting transactions of a business. The terminology refers to the days of hand-written accounting records, when daily transactions were were entered in a journal and later posted to individual account ledgers.
In Manager, most transactions are entered in other functional tabs, thereby automating many decisions about account posting and reducing errors. So normally journal entries are relatively few. In the past, entries made using journal entries were limited.
Note: A new revision now allows journal entries to be used for starting balances and in many more situations.
Journal Entries can be added, changed (edited), viewed, deleted, printed or made inactive.
The Journal Entries tab is always enabled for every business. To make a journal entry, go to that tab and click New Journal Entry:

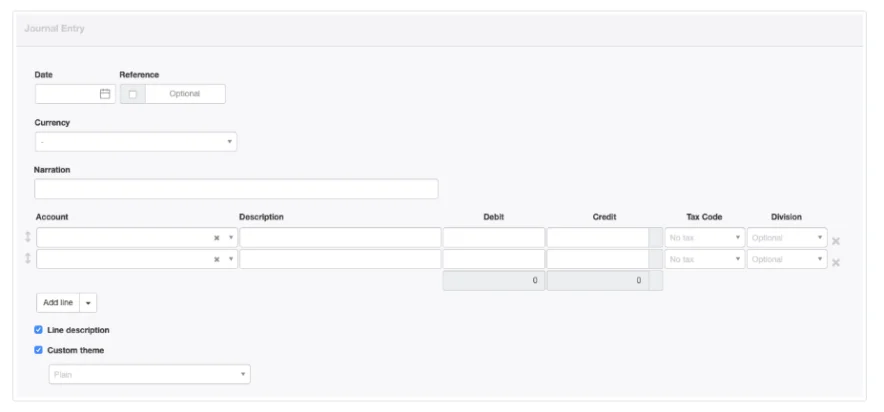
Complete the entry:

- Date is prefilled with today’s date, but can be edited.
- Reference can be used for any form of identifier. If the box within the field is checked, Manager will add a sequence number automatically when the journal entry is created. Manager finds the highest Reference among existing journal entries and adds 1.
- The Currency field appears if more than one currency is defined, allowing selection of the currency for the transaction.
- Narration should be a brief description of the overall transaction being entered.
- Account indicates which account a line will post to. If necessary, subaccount fields appear and must be completed.
Notes
The journal entry form initially opens with fields for two line items, and every journal entry must include lines for at least two accounts. More can be entered, as long as the sum of all debits equals the sum of all credits. Click Add line if more lines are needed.
If an account and subaccount are chosen that involve previously specified inventory locations, an Inventory location field also appears:
If an account and subaccount are chosen that involve previously specified inventory locations, an Inventory location field also appears:

- Description for each line item is optional. These fields appear only if the Line description option further down the screen is checked.
- Enter debit amounts under the Debit column and credit amounts under Credit.
- Select a Tax Code and Division if applicable. Frequently they are not for journal entries. (These fields do not appear unless tax codes and divisions have been defined under Settings.
Note
If a tax code is selected, a dropdown field appears. Select whether the journal entry represents a sale or sale adjustment or a purchase or purchase adjustment. Manager uses this information to properly categorize journal entries on tax reports:
If a tax code is selected, a dropdown field appears. Select whether the journal entry represents a sale or sale adjustment or a purchase or purchase adjustment. Manager uses this information to properly categorize journal entries on tax reports:

- A Custom theme can be selected if any are active.
Caution
If a journal entry line item requires a tax code, enter the gross amount, including tax. The amount debited or credited to the selected account is automatically reduced, proportionate to the tax code. The reduction is debited or credited to the tax liability account designated in the tax code’s definition. See the example below.
If a journal entry line item requires a tax code, enter the gross amount, including tax. The amount debited or credited to the selected account is automatically reduced, proportionate to the tax code. The reduction is debited or credited to the tax liability account designated in the tax code’s definition. See the example below.
Because debits and credits must balance for all journal entries, Manager calculates the difference between their sums as inputs are made. The difference shows in a temporary Out of balance field, which disappears when balance is zero:

Order of lines can be changed by dragging the arrow symbols to their left. Lines can be deleted by clicking X to their right.
Note
By long tradition in accounting, debits in a journal entry are entered first, followed by credits. But the order has no financial impact.
By long tradition in accounting, debits in a journal entry are entered first, followed by credits. But the order has no financial impact.
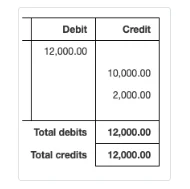
Click Create to save the entry. If the journal entry includes more than one debit or credit, the finished transaction view will show totals for both:

Example
Brilliant Industries purchases a delivery truck and records it as a fixed asset. At the same time, it buys and installs a package rack in the truck. The rack costs 100.00, inclusive of 10% tax. Brilliant posts the tax-inclusive payment to its Motor vehicle expenses account, applying the 10% tax code.
Brilliant’s accountant later determines that local tax law requires the cost of the rack, including tax, to be capitalized and depreciated as part of the cost of the truck, not taken as a current operating expense. So the rack’s full cost, including tax, must be shifted to the Fixed assets account. And since the tax can no longer be counted as an offsetting input tax, it must be removed from the Tax payable account.
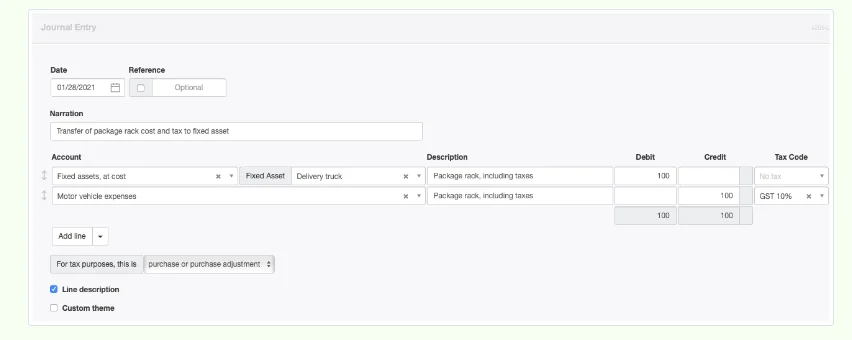
This oversight is corrected with a single journal entry. The transaction records a 100.00 debit to Fixed assets and the subaccount for the truck. No tax code is selected. To balance this, a 100.00 credit is posted to Motor vehicle expenses with a 10% tax code applied.The journal entry is designated as a purchase adjustment:

When the journal entry is created, the book value of the truck in Fixed assets goes up by 100.00. But the balance of the Motor vehicle expenses account only goes down by 90.91. The remaining 9.09 is added to Tax payable to compensate for the input tax that can no longer be claimed. The accuracy of the Motor vehicle expenses account is preserved because, when the rack was originally recorded as a tax-inclusive payment, only 90.91 was posted to the expense account. (90.91 x 1.10 = 100.00)
